Micro Frontends for Mobile
On the Web, We have seen significant benefits from including micro frontends, which break up frontend monoliths into many smaller, more manageable pieces, and make many teams work simultaneously on a large and complex product. But Micro frontends for mobile seem stuck these days. In this article, we will describe a comprehensive guide to bringing these benefits to native mobile apps, as well as cover some of the implementation options that are available for mobile. And finally, we will dive deep into a full example application to show the technique.
Micro frontends, aka MFEs, have continued to gain in popularity since they were marked as ‘Adopt’ on the Thoughtworks technology radar in 2019 [1]. We’ve seen many projects use this architecture in the last few years, and the result turns out very well. So that for many of our colleagues this is becoming the sensible default pattern for building modern enterprise web applications.
In the meantime, Micro frontends for mobile are not going well like the Web. It’s brought in the Thoughtworks technology radar since 2020 but still stops at the ‘Trial’ stage [2]. Many mobile developers continue to struggle with the monolithic codebase. Sadly, there’s not much guide that outlines what the Micro frontends for mobile are and how to do it.
Lately mobile has been becoming the first-class citizen for business requirement shipping. Some companies start with mobile apps directly instead of Web App, especially unicorn companies. And more and more corporations are paying more attention to the mobile platform, and the mobile team goes from a dozen people to scores of people, even hundreds. At the same time, declarative UI (SwiftUI, Jetpack compose) makes mobile development analogous to Web development. A lot of Web frontend technologies and solutions are crowding into mobile, Micro frontends are no exception.
Micro frontends are defined as “An architectural style where independently deliverable frontend applications are composed into a greater whole” [3]. Unlike Web applications, the mobile app has more limitations. For example, we deliver one app to the Apple App Store or Google Play store instead of several applications. A hotfix is disallowed by the mobile platform. So we refined the definition of micro frontends for mobile as below:
An architectural style where independently deliverable frontend components with the same cohesive user experience are composed into a greater whole.
The MFE for mobile is one or more components that address the same cohesive user experience, owns by a single small team, and can be built, tested, and deployed to an internal application store with an example app independently. The Shell app will integrate all MFEs and be released to the public.
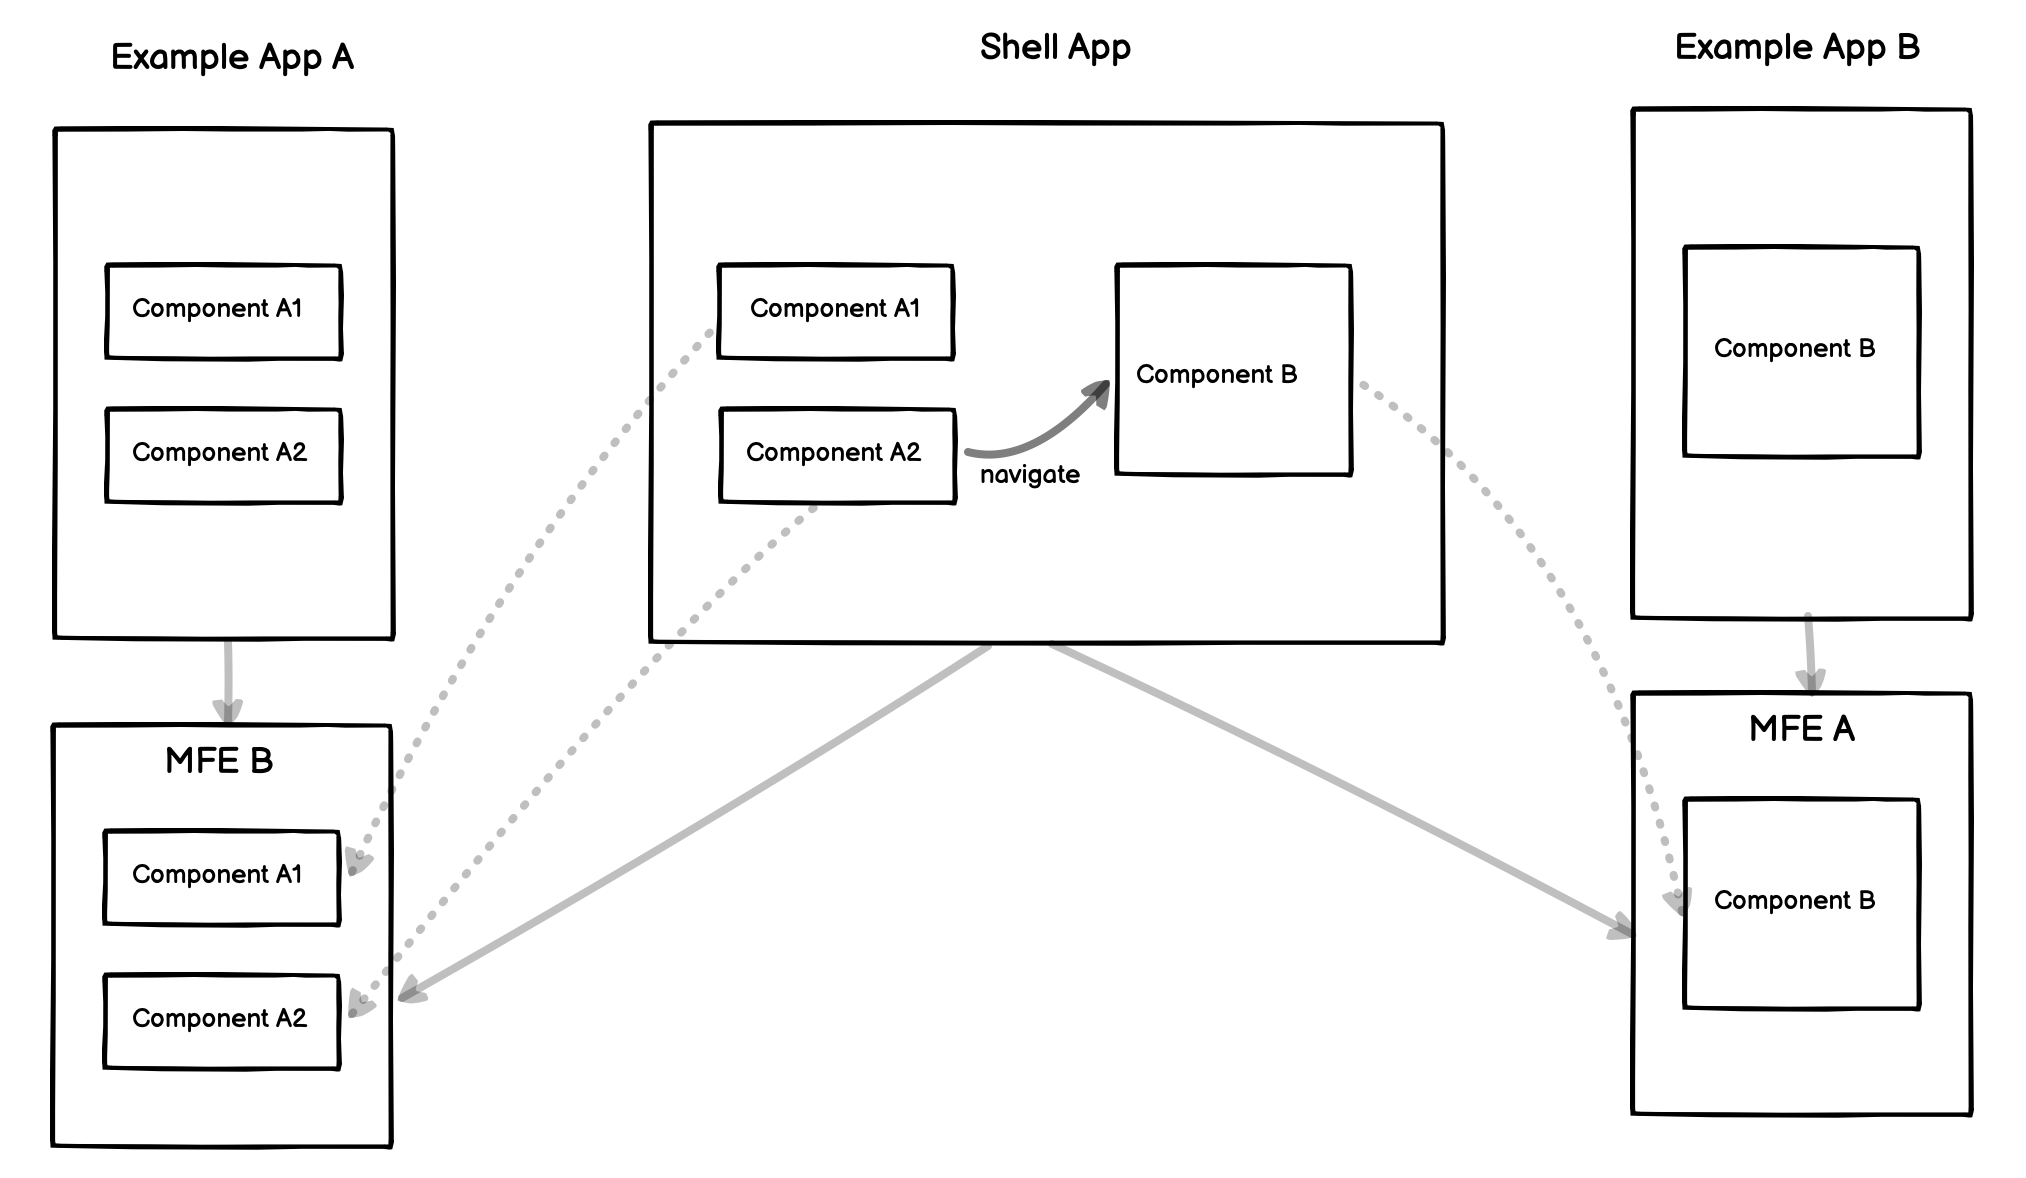 Figure: Each MFE is a collection of components, tested with Example App and released with Shell App.
Benefits
Even if there are more restrictions, Some of the key benefits that still are appealing to mobile developers. And separating MFE by user experience makes business contexts in a small team highly cohesive.
User experience-oriented
Each MFE contains one or more components, each component can be big like a screen or small like a button, but all components should address the same user experience. For instance, the Map MFE only provides a map experience, and the payment MFE only serves the payment experience to our users.
Each MFE only serves one cohesive user experience, and doesn’t and can’t rely on other MFEs. User experience is the minimal unit to split MFEs. We still can reserve some interfaces to switch user experience, but the integration work should be done on the shell application.
Incremental upgrades
For a big legacy codebase, the new option is to split a single user experience and rewrite it in a single MFE. Once the first piece succeeds, the team will have the confidence to rewrite all experiences with a new technique. So incremental upgrades also suit well for mobile.
Simple, decoupled codebases
We split our codebase into smaller ones via user experience boundaries from a monolithic codebase. The smaller codebases tend to be simpler and easier for developers to work with. Additionally, the smaller codebases mean less build time, less test time, and less knowledge transfer cost.
It’s easy to push some code buttons under delivery pressure when working on a large codebase. Sometimes just for temporary convenience, the complexity would be brought in two components that should not know about each other. Simple and smaller codebases can help us write high cohesion and low coupling code.
Independent deployment
Due to platform limitations, we can’t deploy several mobile applications and compose them into one on the app store, or the end user’s mobile phones. But we can use an example app to deploy MFE components to the internal app library. Each MFE example app should have its pipeline, which builds, tests, and deploys it to the internal app library. Example app should try to simulate the real app environment.
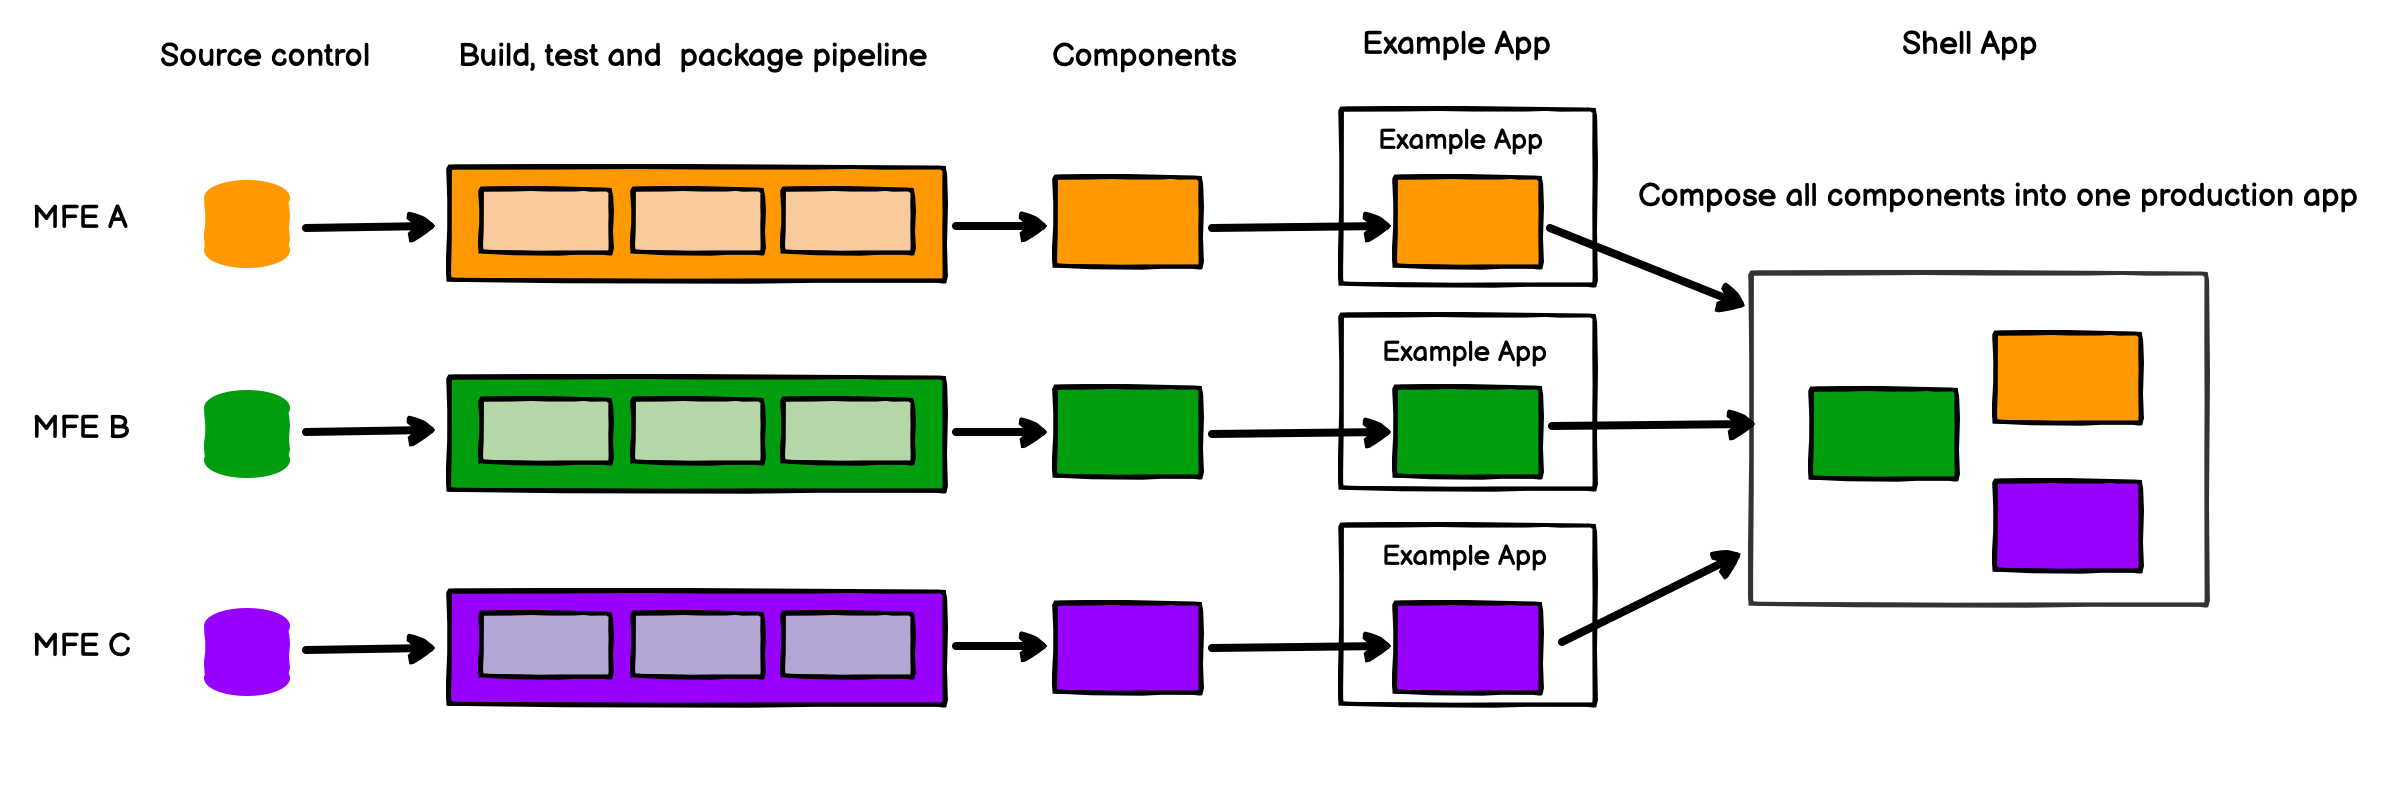 Figure: Each micro frontend is deployed via an example app independently, and only the shell app is released to production.
Autonomous teams
Each MFE has one user experience, so the custodian team has all controls for it without collaborating with other user-experienced teams. And each time can choose their architectures, tech stack or code styles.
Release with a shell app
A shell app is a central app, that integrates all user experiences via MFEs to deliver the whole solution to our users. This central app is just a shell, no more business logic is involved. Each team has a responsibility to integrate their MFEs to the shell app, This is only one mess place that every team can work on. It’s not a big deal due to its lightweight implementation. In the stable team, the changes on this repository are just upgrading the version of MFEs.
The example
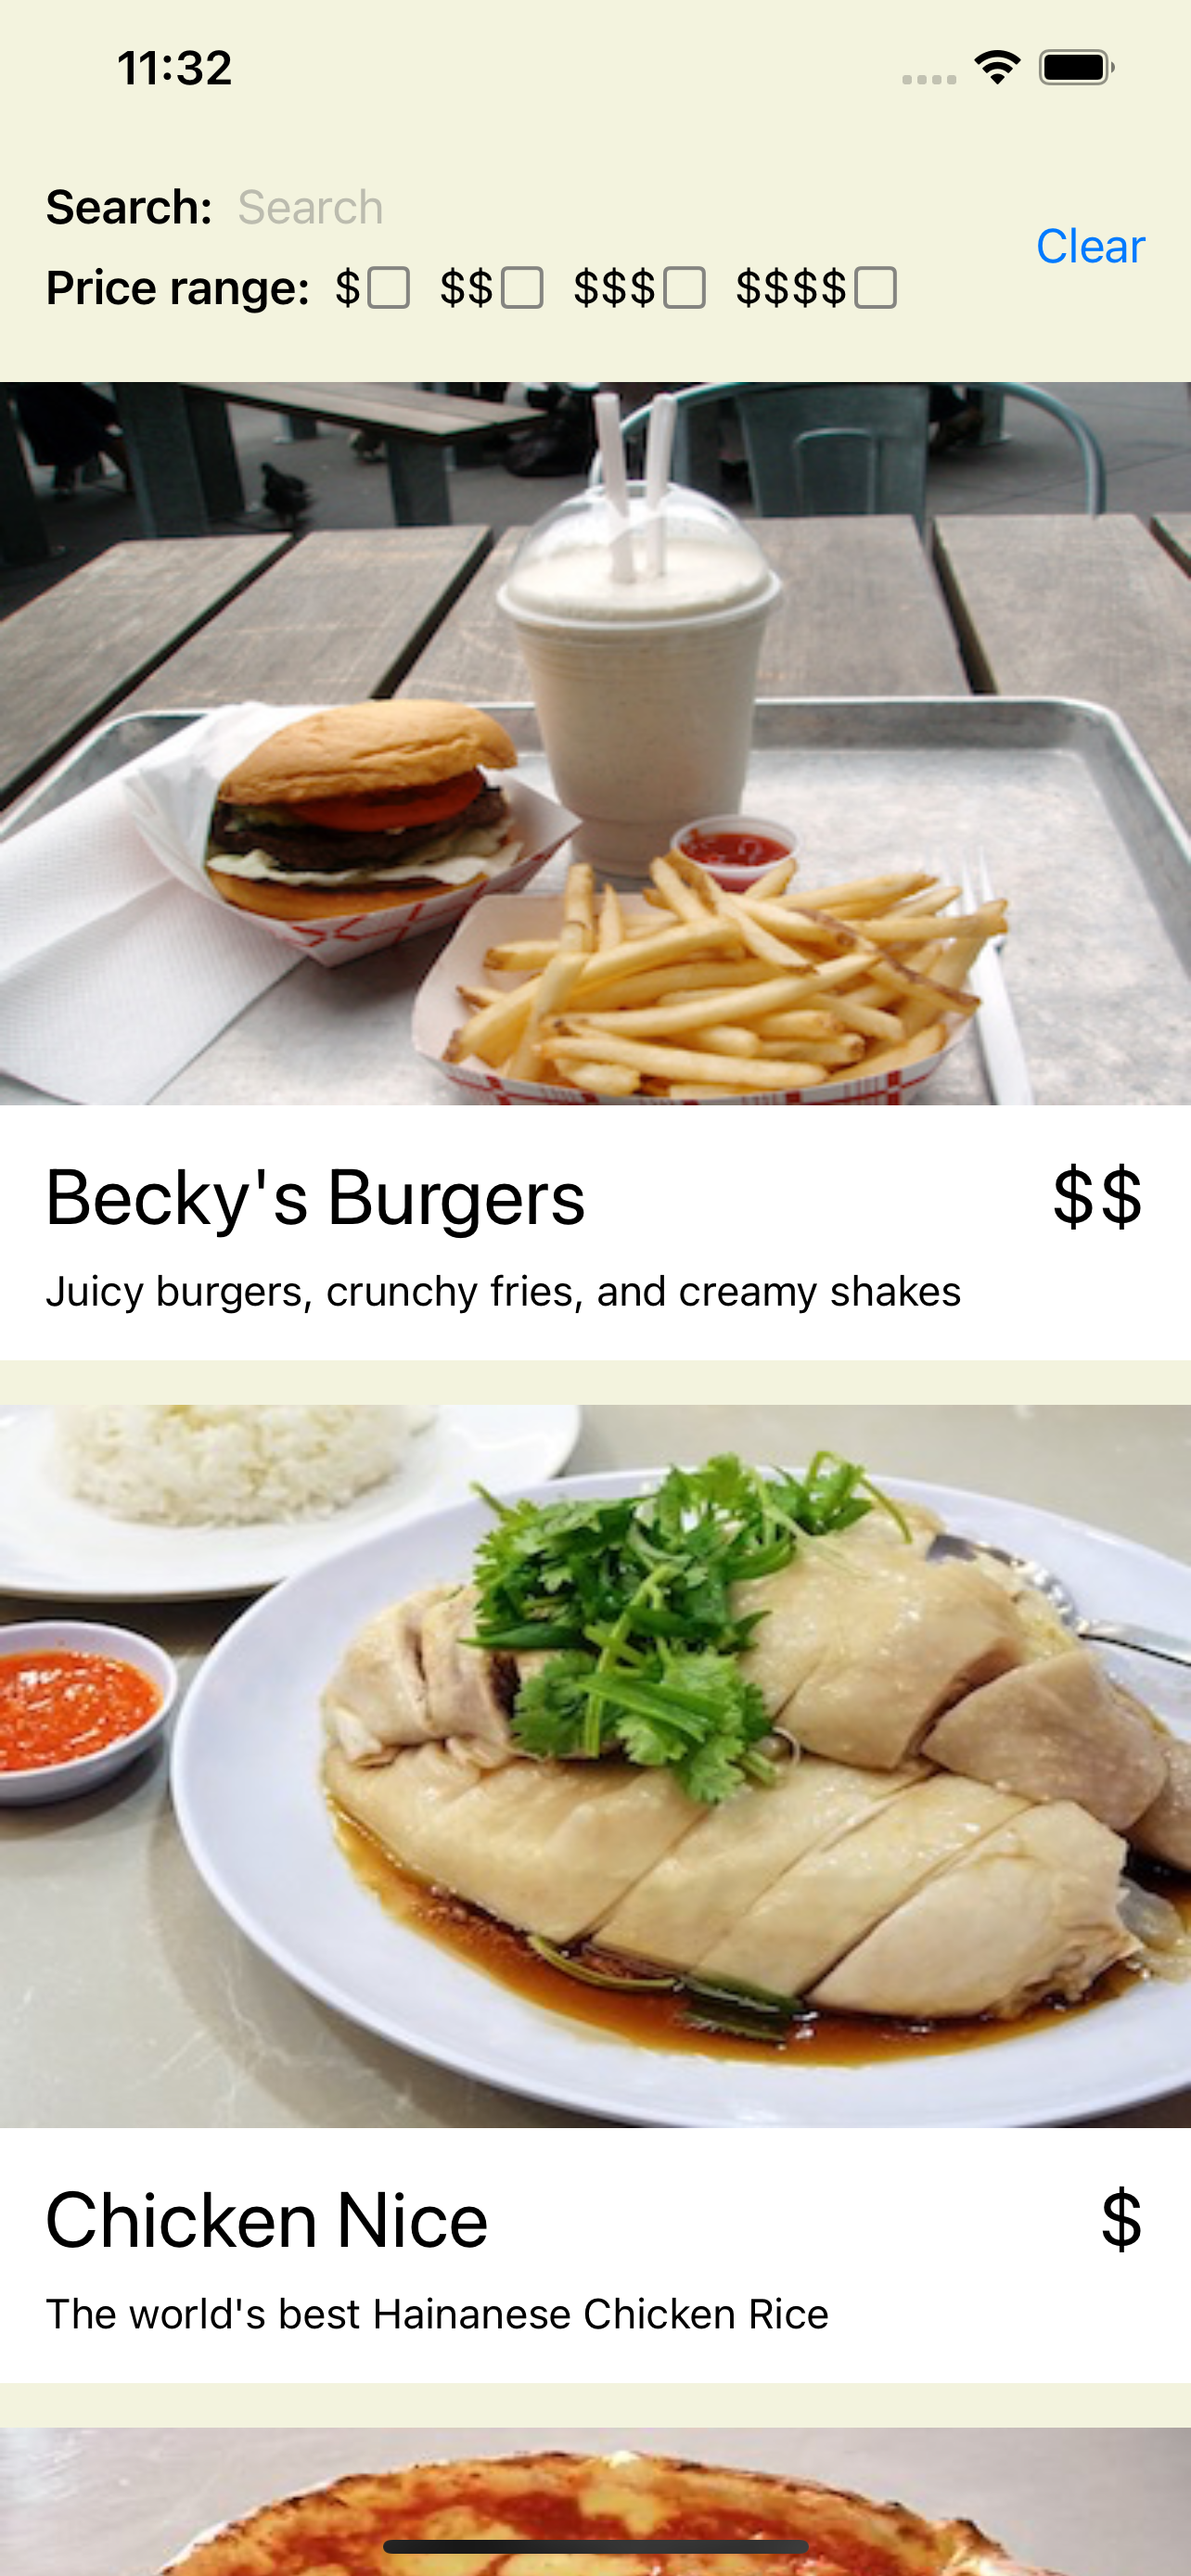
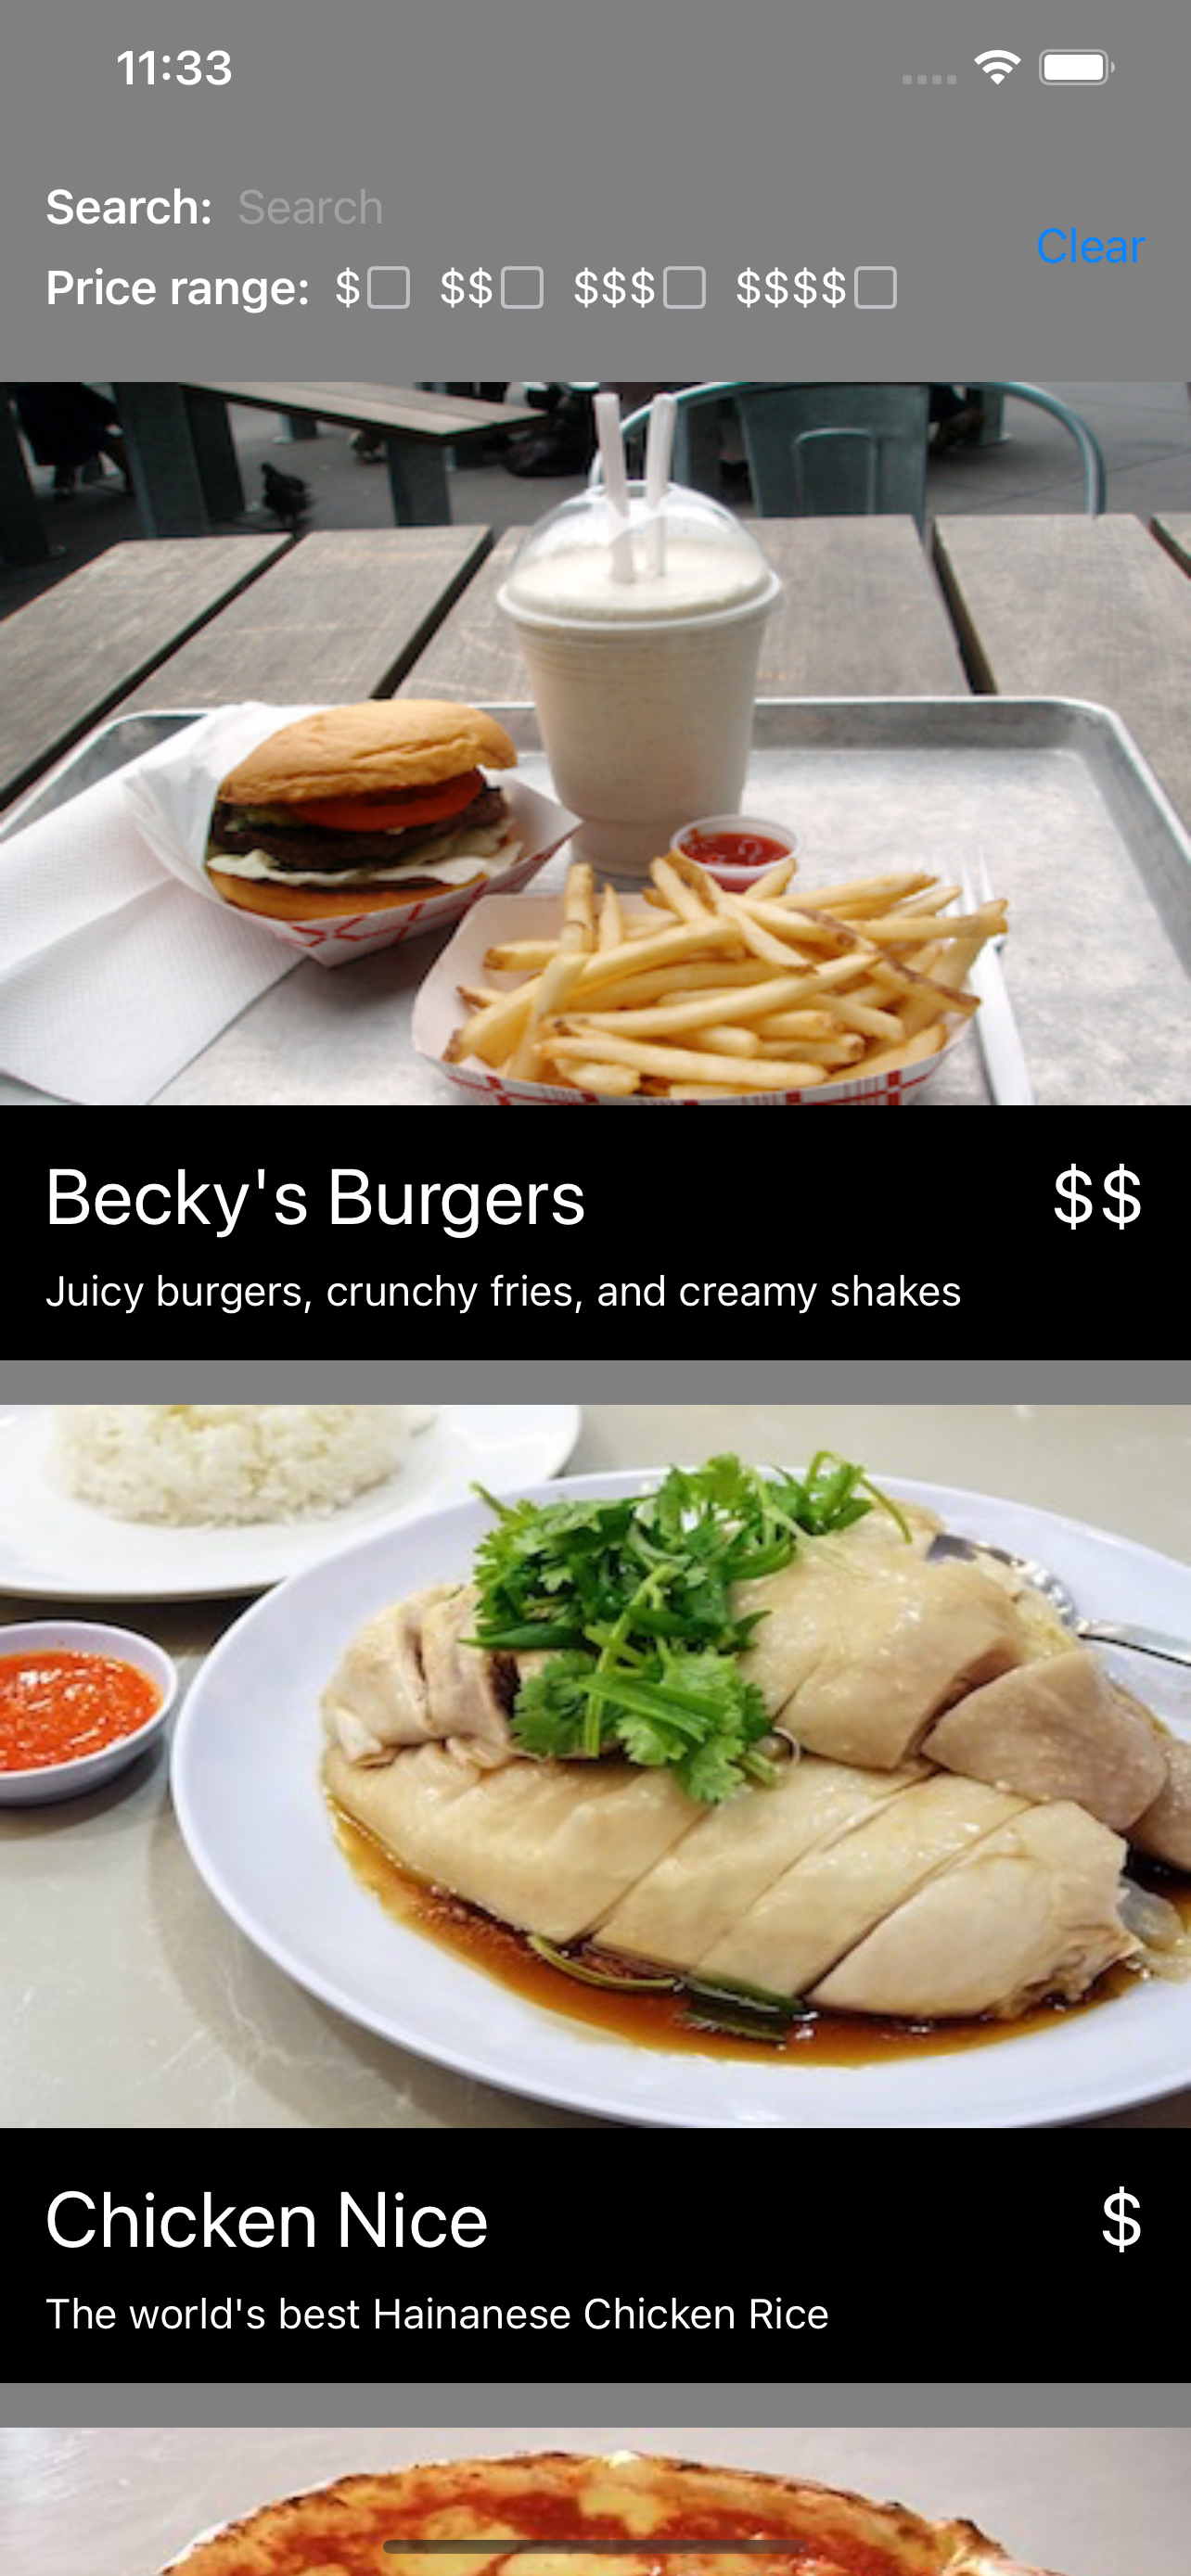
Feed Me application, a website where users can order food is a good example that Cam Jackson used to demonstrate MFEs in his micro-frontends article. Here we use the same application but design it for mobile, hope it can be a standard application that shows MFEs architecture, like TodoMVC does for MV* framework. The business is described below [4] :
- There should be a restaurant screen where users can search, filter, and browse for restaurants.
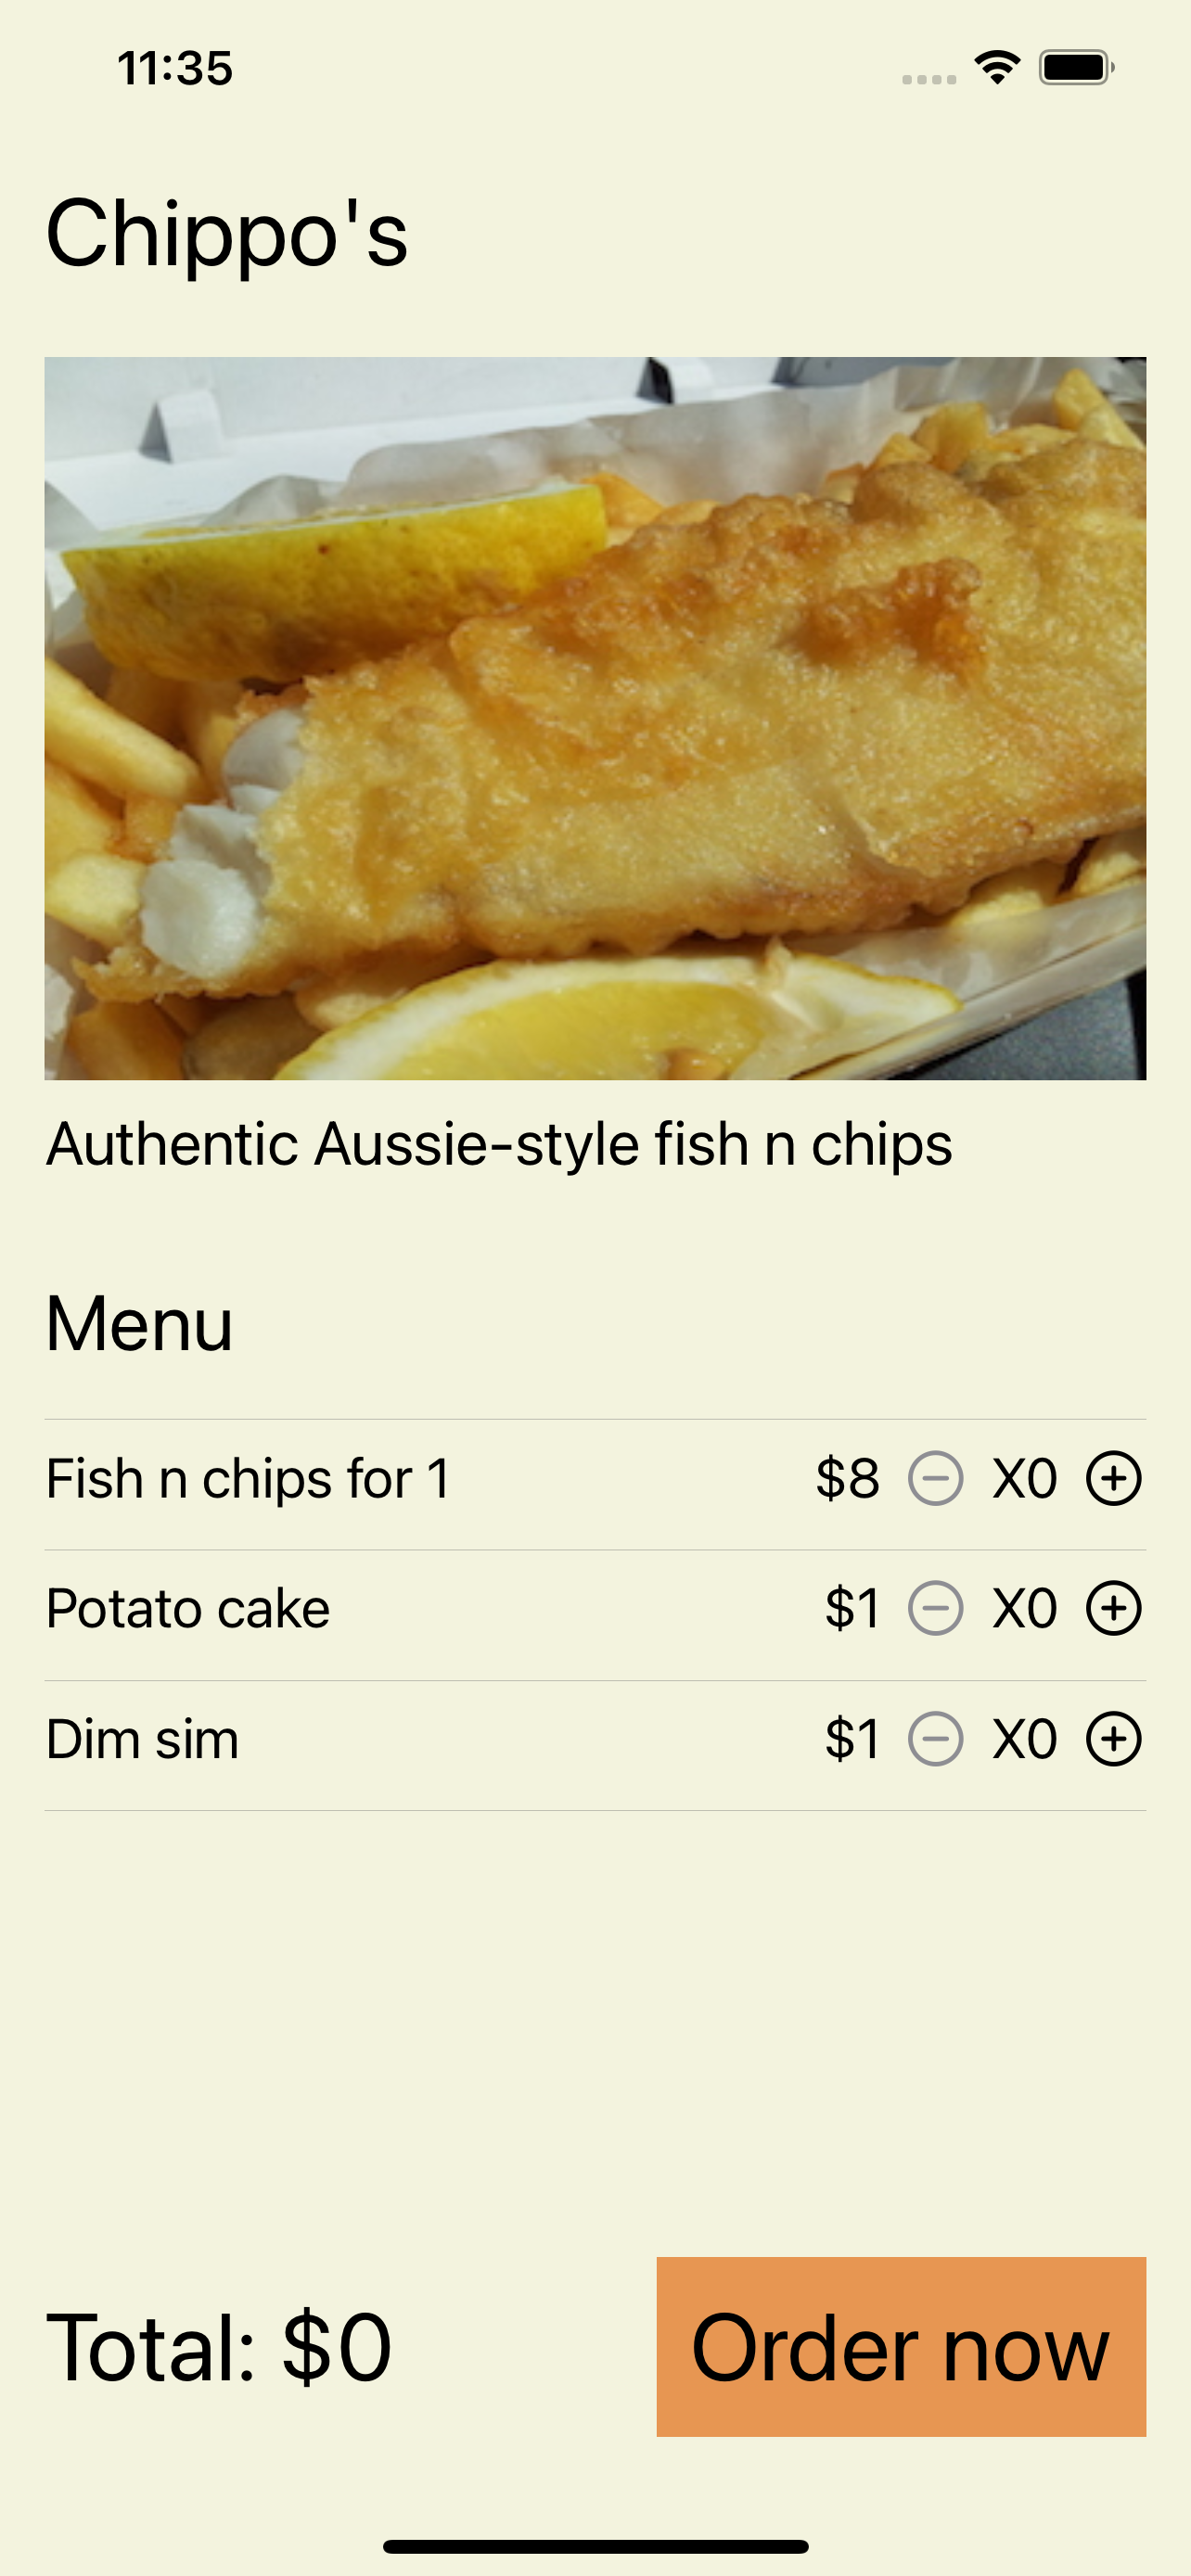
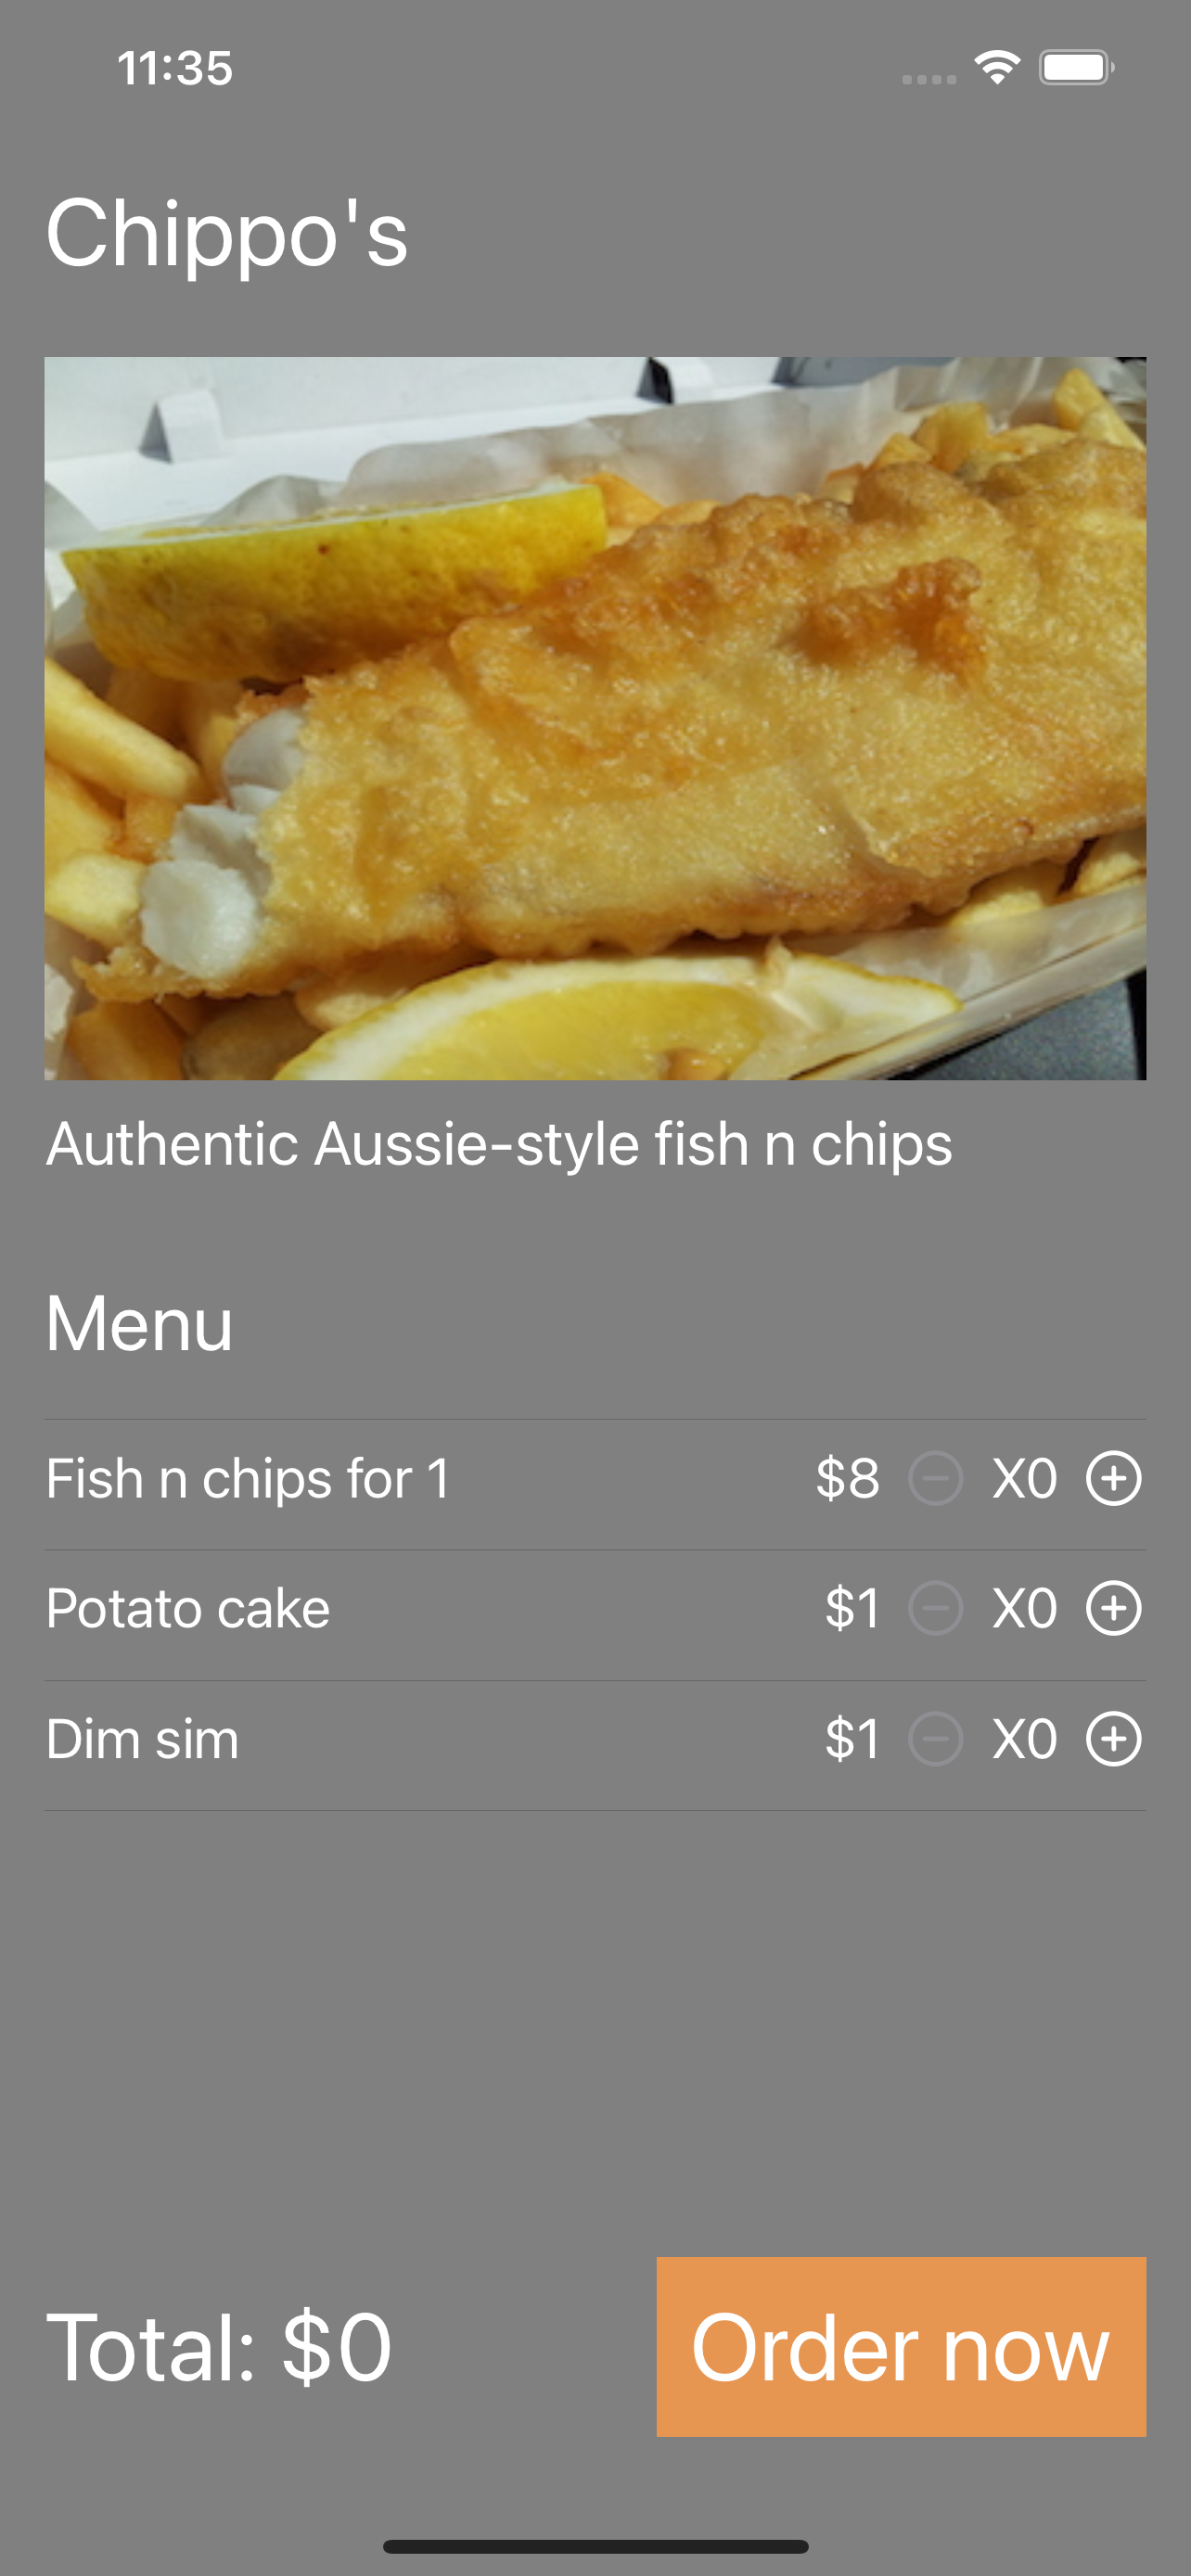
- Each restaurant needs a screen that shows its menu items and allows users to order.
- Users should have a profile page where they can see their order history, track delivery, and customize their payment options.
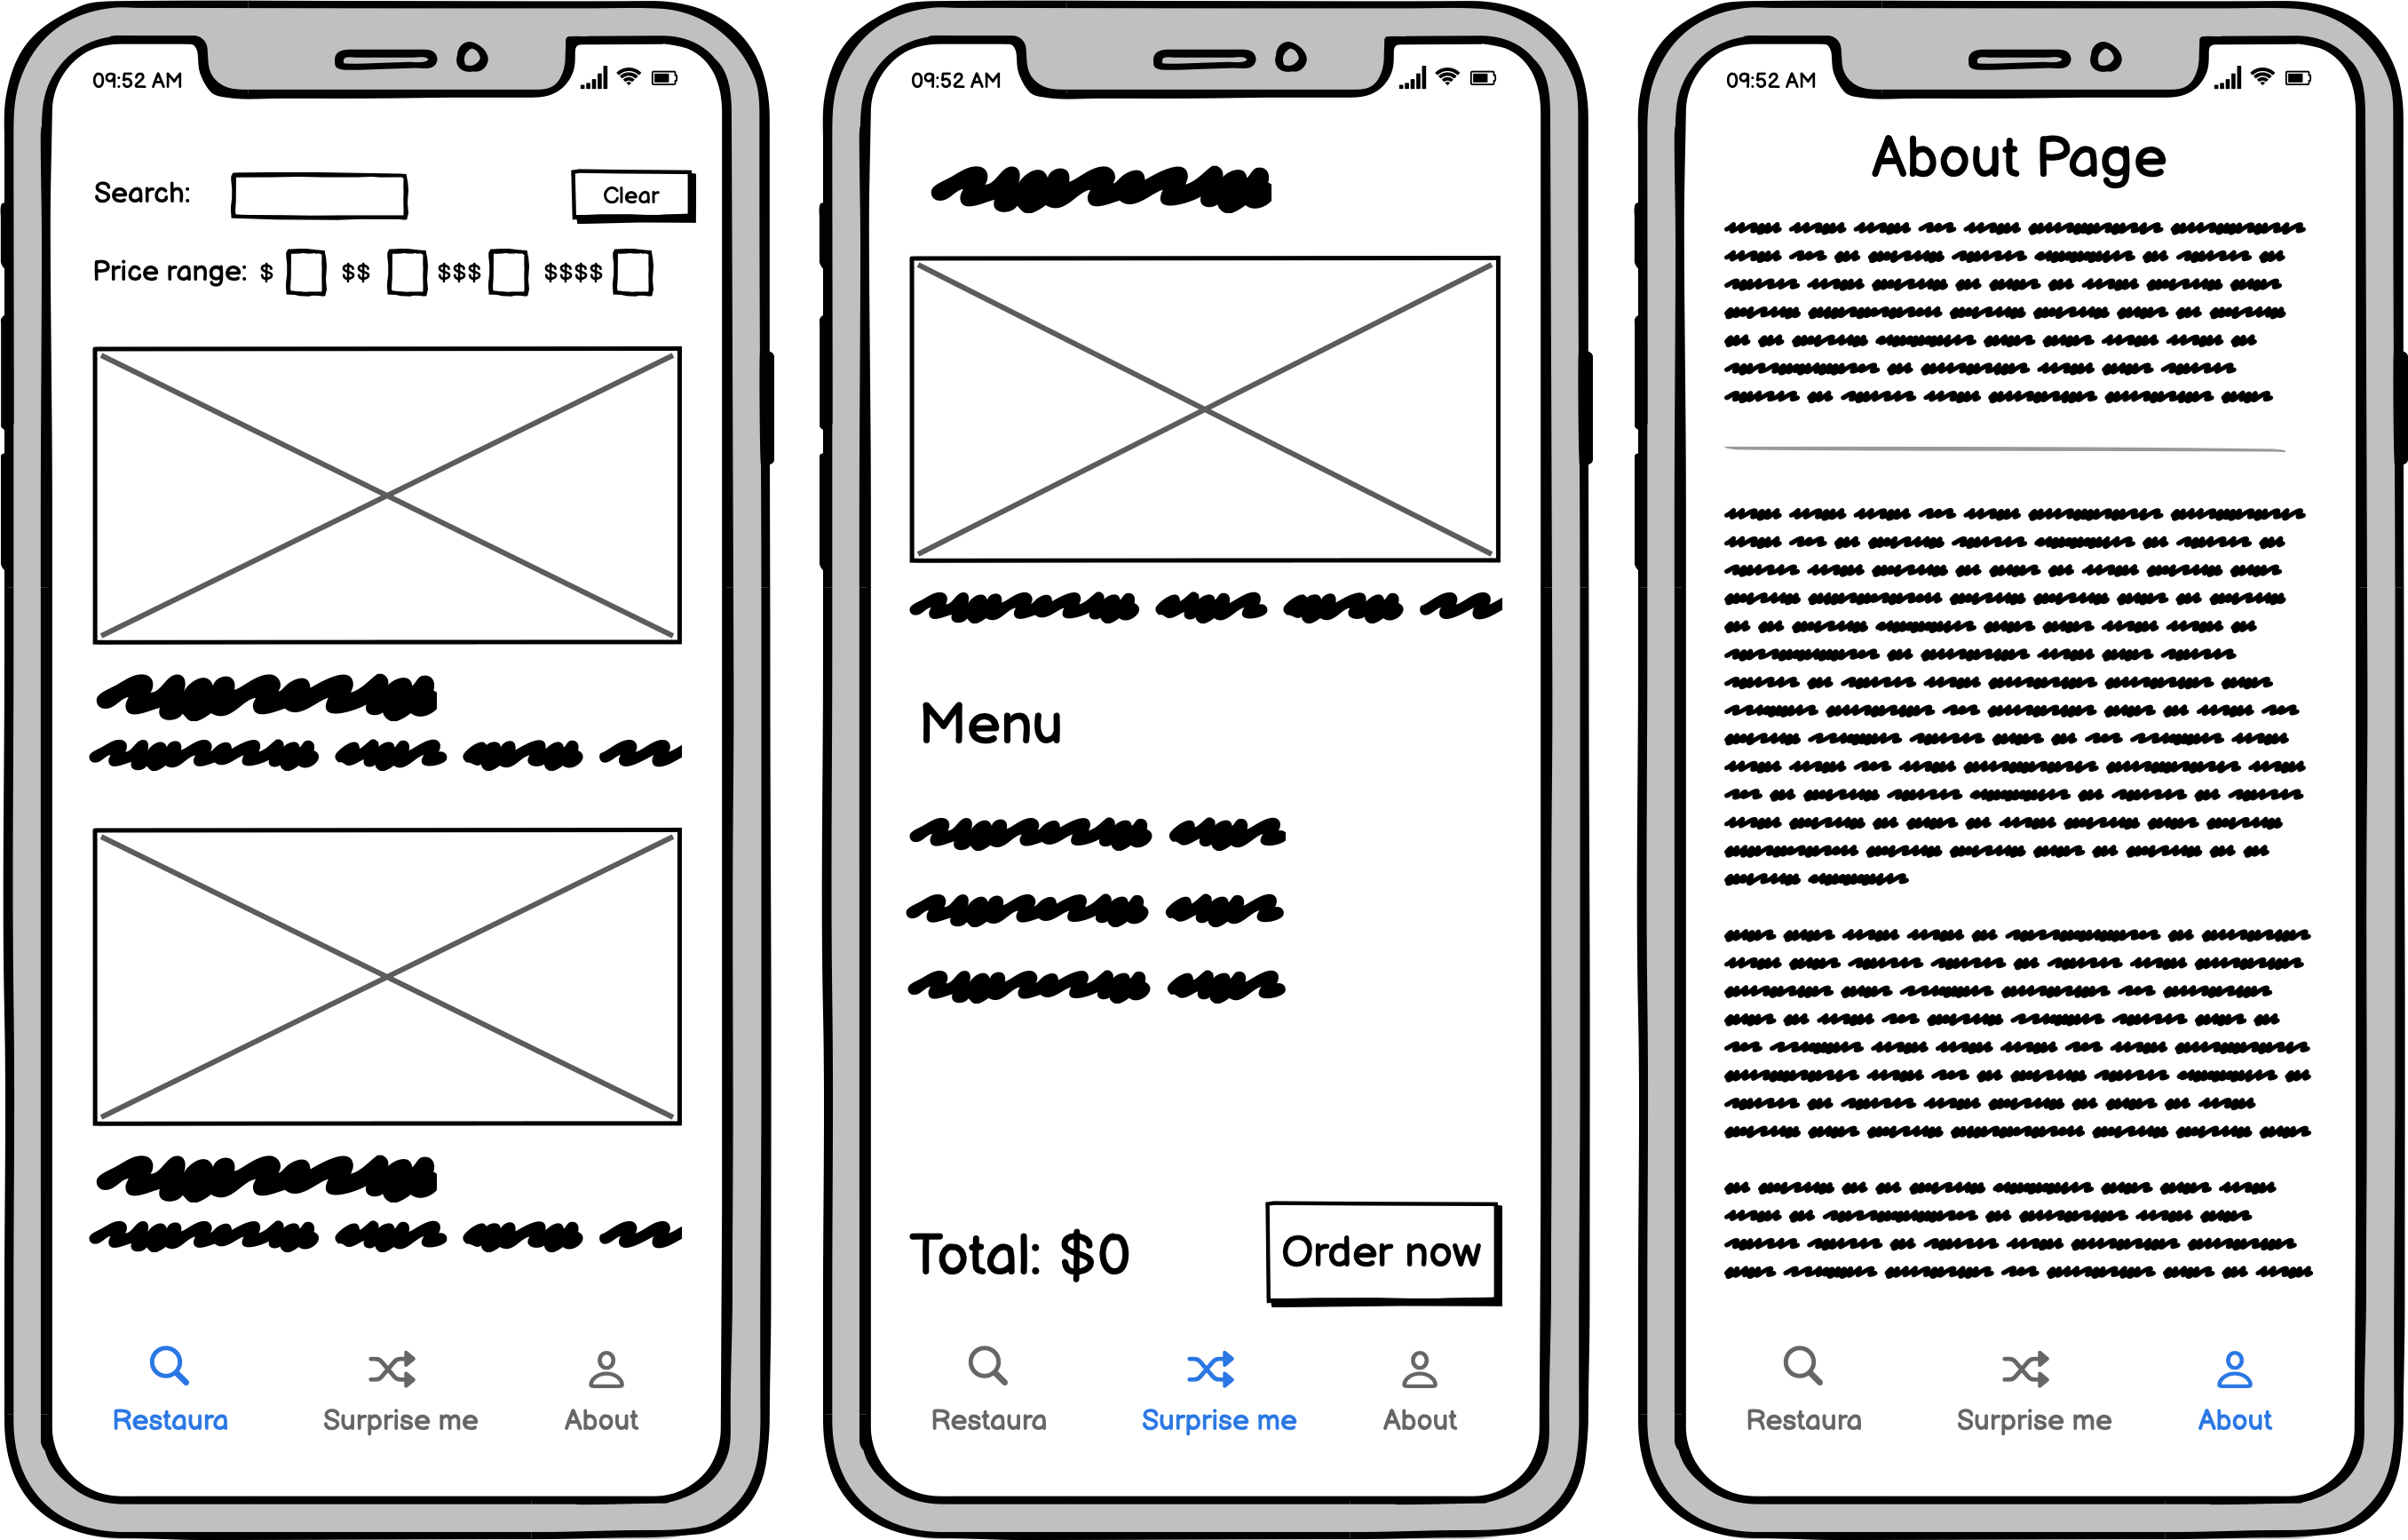 Figure: A food delivery app may have several reasonably complex screens
For appearance, we use a similar design to the website. In addition, It supports dark mode.
Throughout the rest of this article, we’ll be using this example application wherever we need example code or scenarios.
Integration approaches
Before integration, we need to split MFEs out first. Given the business above, there are many reasonable approaches to splitting MFEs out. We recommend splitting MFEs via different user experiences. There are three user experiences, which are located in three-tab views:
- Users can search, filter, and browser restaurants -
Browse MFE - Users can order food in each restaurant -
RestaurantOrder MFE - Users should have an about screen that shows the user profile, order history, and payment options. -
About MFE
It will be split into 3 MFEs and 1 shell app.
By the way, Our demo app is an iOS app, that is built via SwiftUI and Swift package. If you like you can also use UIKit or Podfile. It’s worth pointing out that this architecture is suitable for Android as well. We choose iOS here because we are familiar with it.
Build-time integration
It is a major, somehow the only approach to integrate MFEs to a shell app. It’s to publish each MFE as a Swift package, and have a shell app that includes all MFEs as its dependencies. Here is your Package.resolved might look:
{
  "pins" : [
    {
      "identity" : "about",
      "kind" : "remoteSourceControl",
      "location" : "https://github.com/micro-frontends-mobile/About",
      "state" : {
        "revision" : "e96fdbada870a92fccf918b8b250f9c9d4751149",
      }
    },
    {
      "identity" : "browse",
      "kind" : "remoteSourceControl",
      "location" : "https://github.com/micro-frontends-mobile/Browse",
      "state" : {
        "revision" : "a3590f11f00016e94de4fcb0aa193b14dacd9a57",
      }
    },
    {
      "identity" : "restaurantorder",
      "kind" : "remoteSourceControl",
      "location" : "https://github.com/micro-frontends-mobile/RestaurantOrder",
      "state" : {
        "revision" : "e82e3faa1ccf669f115166aa73e1954dbd228581",
      }
    }
  ],
  "version" : 2
}
Due to bringing in coupling at the build and release stage, This approach is not recommended on the Web, but there are no other choices on mobile native.
Partially Run-time integration via WKWebView
Benefiting from WKWebView, you can use it to incorporate web content seamlessly into your app. It’s a good time to use it When your app’s content changes frequently.
var webView: WKWebView = WKWebView()
let request = URLRequest(url: self.url, cachePolicy: .returnCacheDataElseLoad)
webView.load(request)
Embedding a WKWebView object programmatically into your view hierarchy is another way, It makes WKWebView have a native experience to use your navigation delegate to modify the web view’s navigation behavior. The users can’t feel different using it, but we will get automatic updates via web service after our app is released.
We recommend hosting a WKWebView into the MFE, whether it could serve the whole user experience or not. Since the MFE still needs to integrate its shell app on build-time, it’s a partially run-time integration solution.
Notice your app might be rejected if the core features and functionality dynamically with web technology like HTML5, due to App Store Review Guidelines.
Micro Frontends Environment
After splitting the monolithic app into smaller MFEs, the custodian teams can work autonomously. It’s possible to reinvent the wheel when they make all decisions without considering other teams. So it’s a big win to set up a foundational MFE environment that provides common capabilities, which allows the custodian team to only focus on their own user experiences.

Figure: Two-layer architecture for mobile MFEs.
Some common capabilities should (not must) be put into the MFE environment:
- UI components: UI components with consistent design principles will make the whole app like one.
- Configuration: Host common configuration for the whole app.
- Router: A router is a common way to handle communication with different MFEs.
- Authentication and authorization: Very common util that the app should be login once and share the authorized status.
- Network: Some team extracts this as well.
- Cache: Team can use cache to reduce duplicated API requests.
- Analytics tracking
- Logger and monitor system integration
- Create MFE App: A good command-line interface tool will help the team to rump up the codebase with the pipeline.
It’s a good way to create a team to focus on MFE environment setup And make MFEs team easier.
Cross MFE communication
If you found one MFE has many communications with another one or communicates with many MFEs, You might rethink your MFE separation. A good MFE separation can reduce communication among them, but it can’t avoid it.
Navigation is a common communication, for example, when we click a restaurant card, it will bring us to an order screen. We can solve this problem via a router, a common tool in our MFE environment, as mentioned above.
Another common way is to use Notification, which broadcasts information through a notification to all registered observers. MFE can subscribe to notifications to exchange information.
Backend services
Since we have separated our frontends via user experiences, it’s straightforward to separate micro services using user experiences as well. Comparing the BFF pattern, User experiences API can be used by both mobile and web, and also help write cohesive and decoupling code on the server-side.
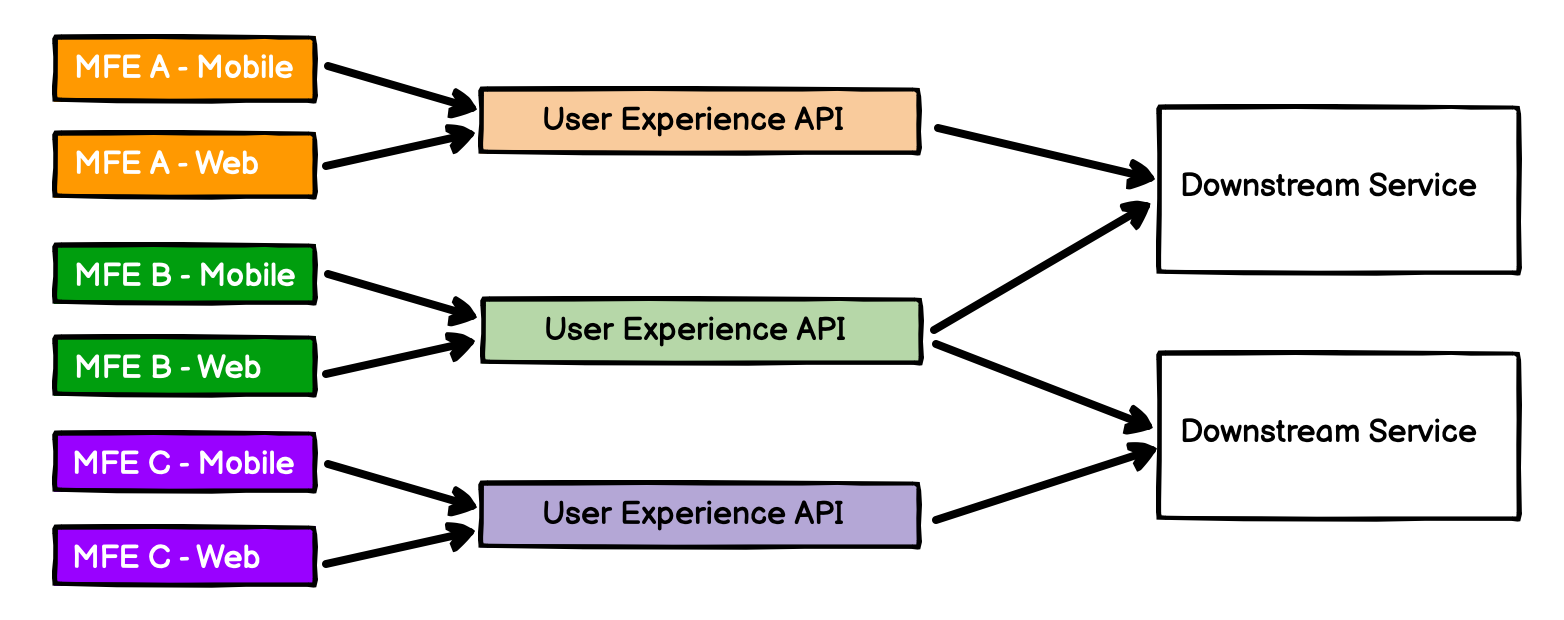 Figure: Group services using user experiences.
Decision Record
Idea exchanges, inspiration and thinking processes is a valuable possession for a team. What/how/why the team makes the current decision is worthy to record. It’s a good way to share contexts in years.
The example in detail
The rest of this article will be a detailed explanation of how the Feed Me application can be implemented. We’ll focus mostly on how to use the Swift package to host MFEs, and how to integrate them into the shell app. And the full source code can be seen on Github.
| Light mode | Dark mode |
|---|---|
 |
 |
Screenshot: Shell app is on light mode and dark mode.
We didn’t set up our services and all assets are coming from Cam Jackson’s demo.
The MFE Environment
Let’s start from Env. Env is a singleton of the MFE environment, it hosts and manages all common capabilities for MFEs. In our demo, it is implemented to an ObservableObject and treated as EnvironmentObject.
public class Env: ObservableObject {
  public private(set) static var shared: Env!

  public static func initialize(router: Router = Router(), configuration: Configuration = Configuration()) -> Env {
    if shared != nil {
      return shared
    }

    shared = Env(router: router, configuration: configuration)
    return shared
  }

  init(router: Router, configuration: Configuration) {
    self.router = router
    self.configuration = configuration
  }

  public let router: Router
  public let configuration: Configuration
}
Currently env only hosts two capabilities:
Configuration
In our demo, we put some theme configurations like backgroundColor and tabBarTintColor which will be shared in all MFEs to make visual consistency. And also, the color can be changed to adapt to dark mode automatically. Another configuration is API host, here we shamelessly use Cam Jackson’s APIs.
public struct Configuration {
  public init() {}
  public var backgroundColor: Color {
    UI.color(token: .backgroundColor)
  }

  public var tabBarTintColor: Color {
    UI.color(token: .tabBarTintColor)
  }

  public var host: String {
    "https://content.demo.microfrontends.com"
  }

  public var demoHost: String {
    "https://demo.microfrontends.com"
  }
}
Router
The router is carefully designed for navigation. Our demo uses it to switch user experience from browsing restaurant list to order screen.
open class Router: ObservableObject {
  public init() {}
  open func navigate<Source>(to: String, source: () -> Source) -> AnyView where Source : View {
    AnyView(NavigationLink {
      route(to)
    } label: {
      source()
    })
  }

  open func route(_ to: String) -> AnyView {
    AnyView(Text("\(to)"))
  }
}
Instead of encapsulating the destination view, here Router encapsulates NavigationLink. It needs to be wrapped by NavigationView when we use it. There is a detailed example later. Here, Router has a default implementation, it will route to a View with Text. You can overwrite it in your app. The typical route function should be like the below:
  override func route(_ to: String) -> AnyView {
    if to.match("/restaurants") {
      return BrowseView()
    } else if to.match("/restaurants/{id}") {
      return OrderView()
    } else {
      ...
    }
  }
In our design. ShellApp is a good place to overwrite Router. You can also design your Router pattern, it is a principle not to create dependencies among MFEs, not to let Env know you have a component named OrderView, that is defined on RestaurantOrder MFE.
Env is a facade that handles all foundational capabilities for all your MFEs and shell APP, you can add more mentioned in the micro frontends Environment section.
The micro frontends
We use Swift packages to manage our MFEs, it’s easy to change to Cocopods if you like. Each MFE is a Swift package. Take Browse MFE as an example, The project folder structure is like below:
.
├── BrowseExample
│   ├── BrowseExample
│   └── BrowseExample.xcodeproj
├── Package.swift
├── README.md
├── Sources
│   └── Browse
└── Tests
    └── BrowseTests
Except for package files, we add an example app named BrowseExample, which will depend on the Browse MFE package locally. Adding Browse MFE as a local package here is a good idea, we can open the BrowseExample app and edit the package. In contrast, we can’t edit the remote package even if we can see the source code.
An example app is important in our scenario, we need to rely on it to deliver our MFEs to the internal app library for test purposes. And also, it’s a good place to elaborate on how to integrate.
Browse MFE
Browse MFE is a restaurant screen where users can search, filter, and browse for restaurants.
| Light mode | Dark mode |
|---|---|
 |
 |
Screenshot: An example app of Browse MFE is on light mode and dark mode.
Let’s start with the example app, BrowseView is a screen-level component that is imported from Browse MFE.
import SwiftUI
import Browse
import Env

struct ContentView: View {
  var body: some View {
    NavigationView {
      BrowseView()
        .navigationBarHidden(true)
        .environmentObject(Env.initialize())
    }
  }
}
Since there is navigation, when we click RestaurantCard, it will navigate to another screen. So we inject Env shared instance to BrowseView as an environment object, which can be read by any child by using EnvironmentObject.
import Env

struct RestaurantListView: View {
  var restaurantList: RestaurantList
  @EnvironmentObject var env: Env

  var body: some View {
    ScrollView {
      VStack(spacing: 16) {
        ForEach(restaurantList) { restaurant in
          env.router.navigate(to: restaurant.url.path) {
            RestaurantCard(restaurant: restaurant)
          }
        }
      }
    }
  }
}
As above, we wrapped RestaurantCard with env.router.navigate(to: restaurant.url.path), it will navigate to the OrderView screen finally, but In Browse MFE, we don’t know there is a screen named OrderView, that is implemented in Order MFE. Env.router helps us to write decoupling code.
Order MFE
| Light mode | Dark mode |
|---|---|
 |
 |
Screenshot: An example app of Order MFE is on light mode and dark mode.
RestaurantOrder MFE is an order screen that users can review, choose and order foods in each restaurant. There are two scenarios to show order view in the Feed Me app:
-
When you click
RestaurantCard, it will navigate to an order view with the specific restaurant informationWe pass a specific URL and show order information as below:
public struct OrderView: View { public init(url: URL) { self.url = url } public var body: some View { ... } } -
When you click the
SurpriseMetab, it will show an order view with a random restaurant informationHere, we don’t need a URL, we will load the restaurant list, and random pick up one to show.
 public struct RandomOrderView: View {
   public init() {}
   public var body: some View {
     Group {
       if viewModel.url != nil {
         OrderView(url: viewModel.url!)
       } else {
         ProgressView()
       }
     }
     .onAppear {
       viewModel.loadData()
     }
   }
 }
Maybe you have noticed, that we need to fetch the restaurant list when we show
RestaurantList. And here we fetch it again for the Suprise tab. Although we can fix this issue using service-side cache or client-side cache in Env, it is a kind of cost we need to afford in MFE architecture.
In all of these two scenarios, we think they are the same user experiences, so we use one MFE instead of two ones, but export two public views.
There is a question: Which view should be displayed on the example app?. The answer is both.
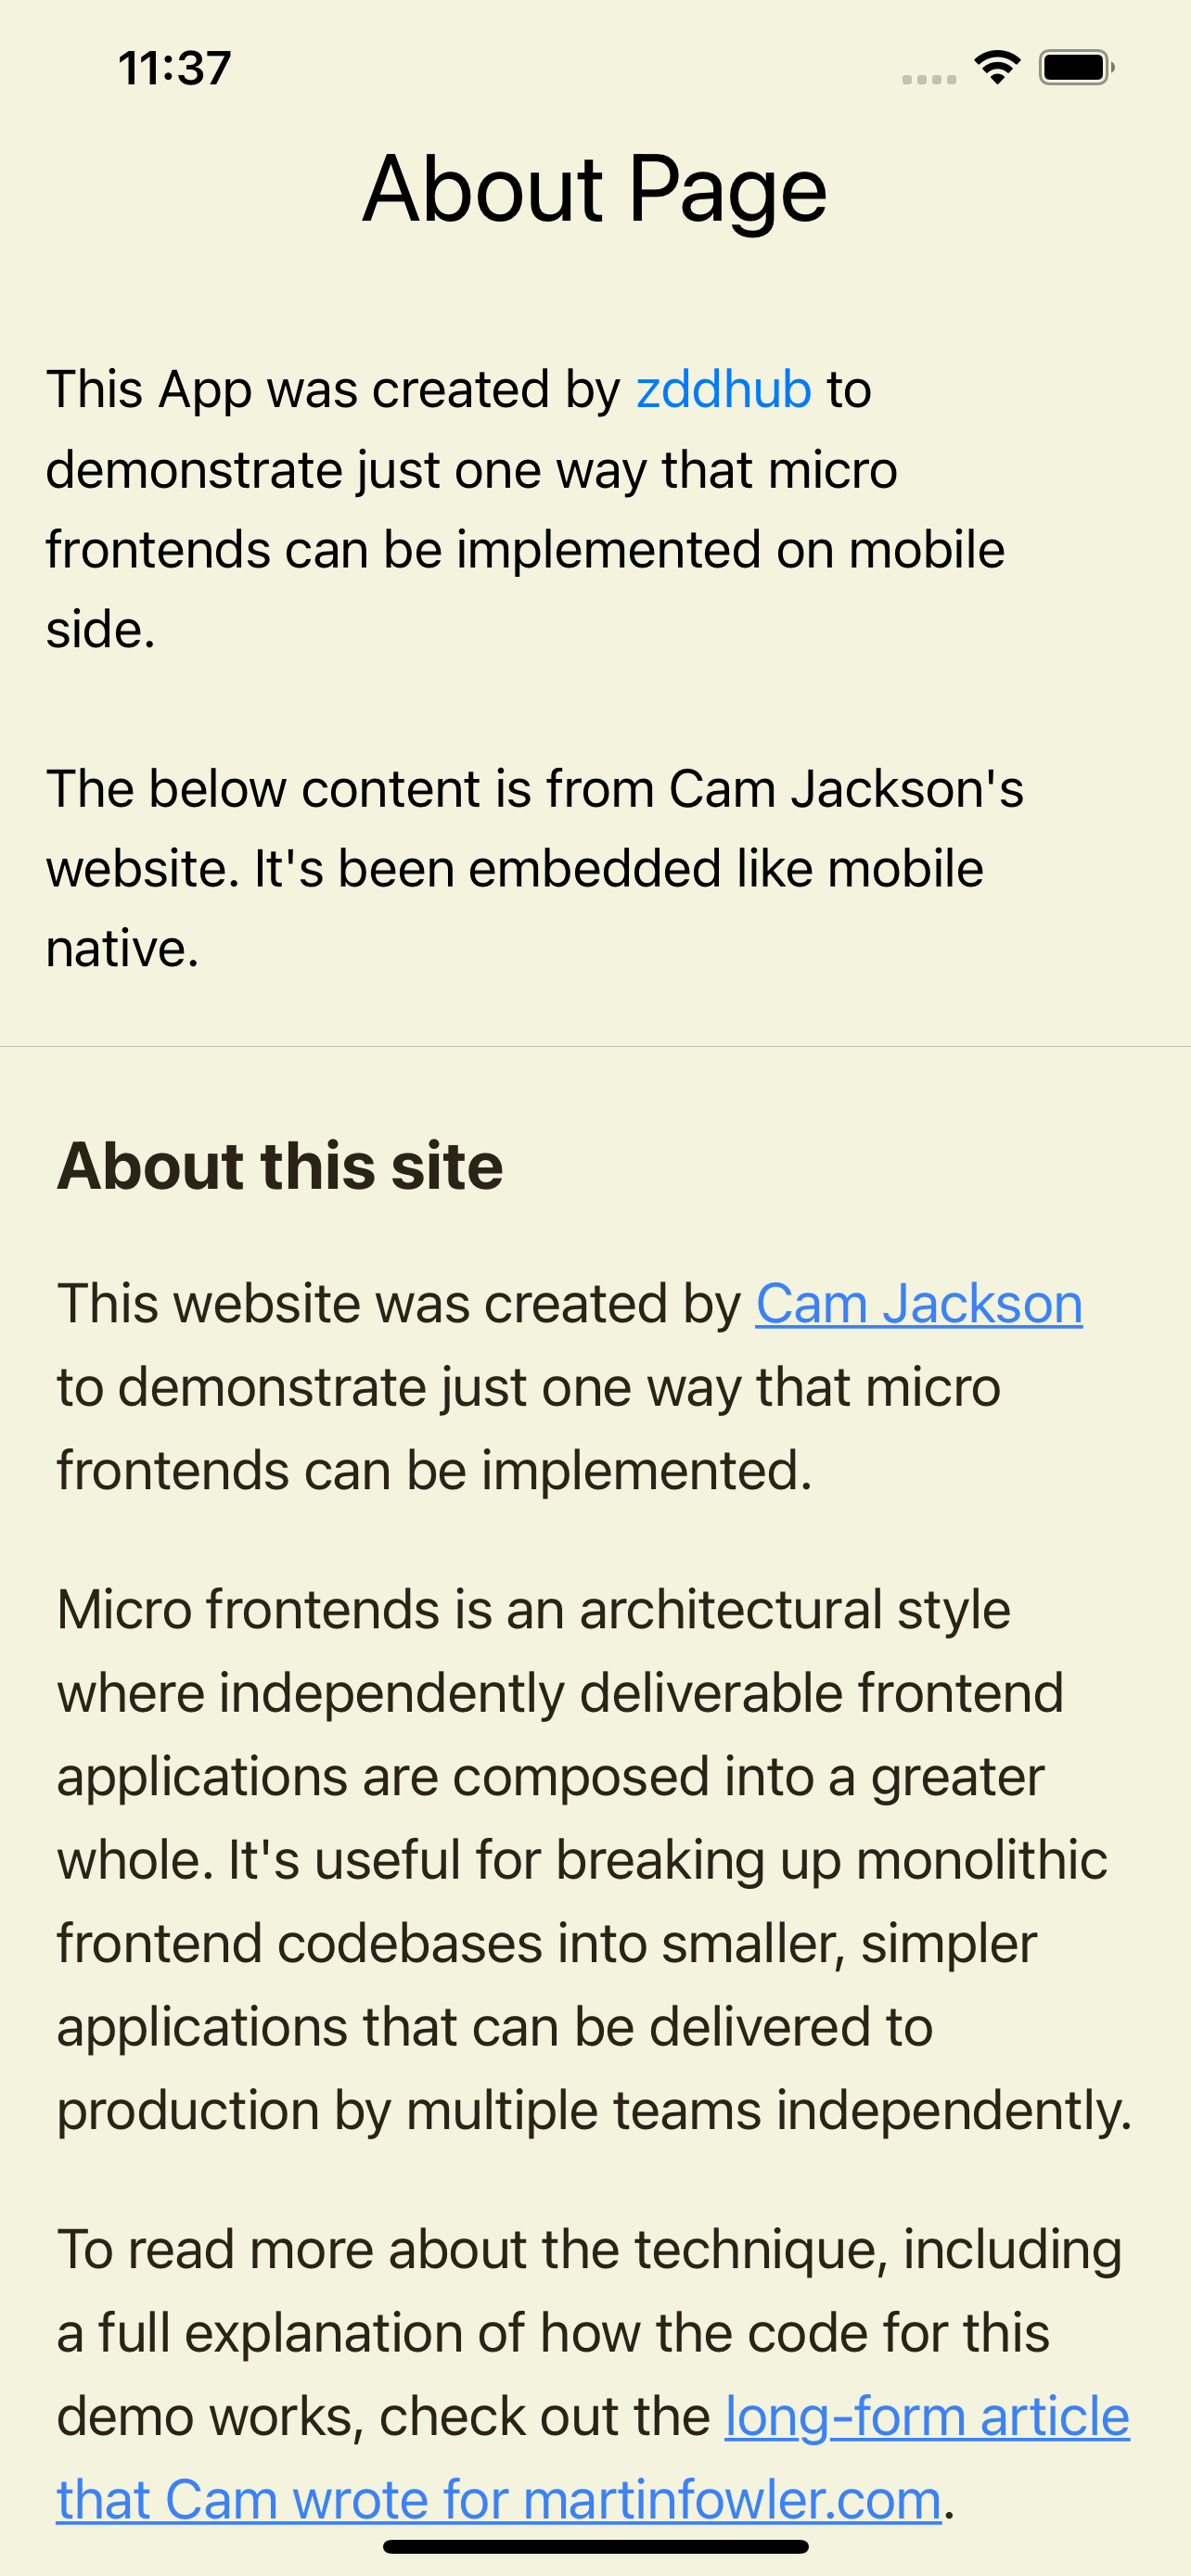
About MFE
| Light mode | Dark mode |
|---|---|
 |
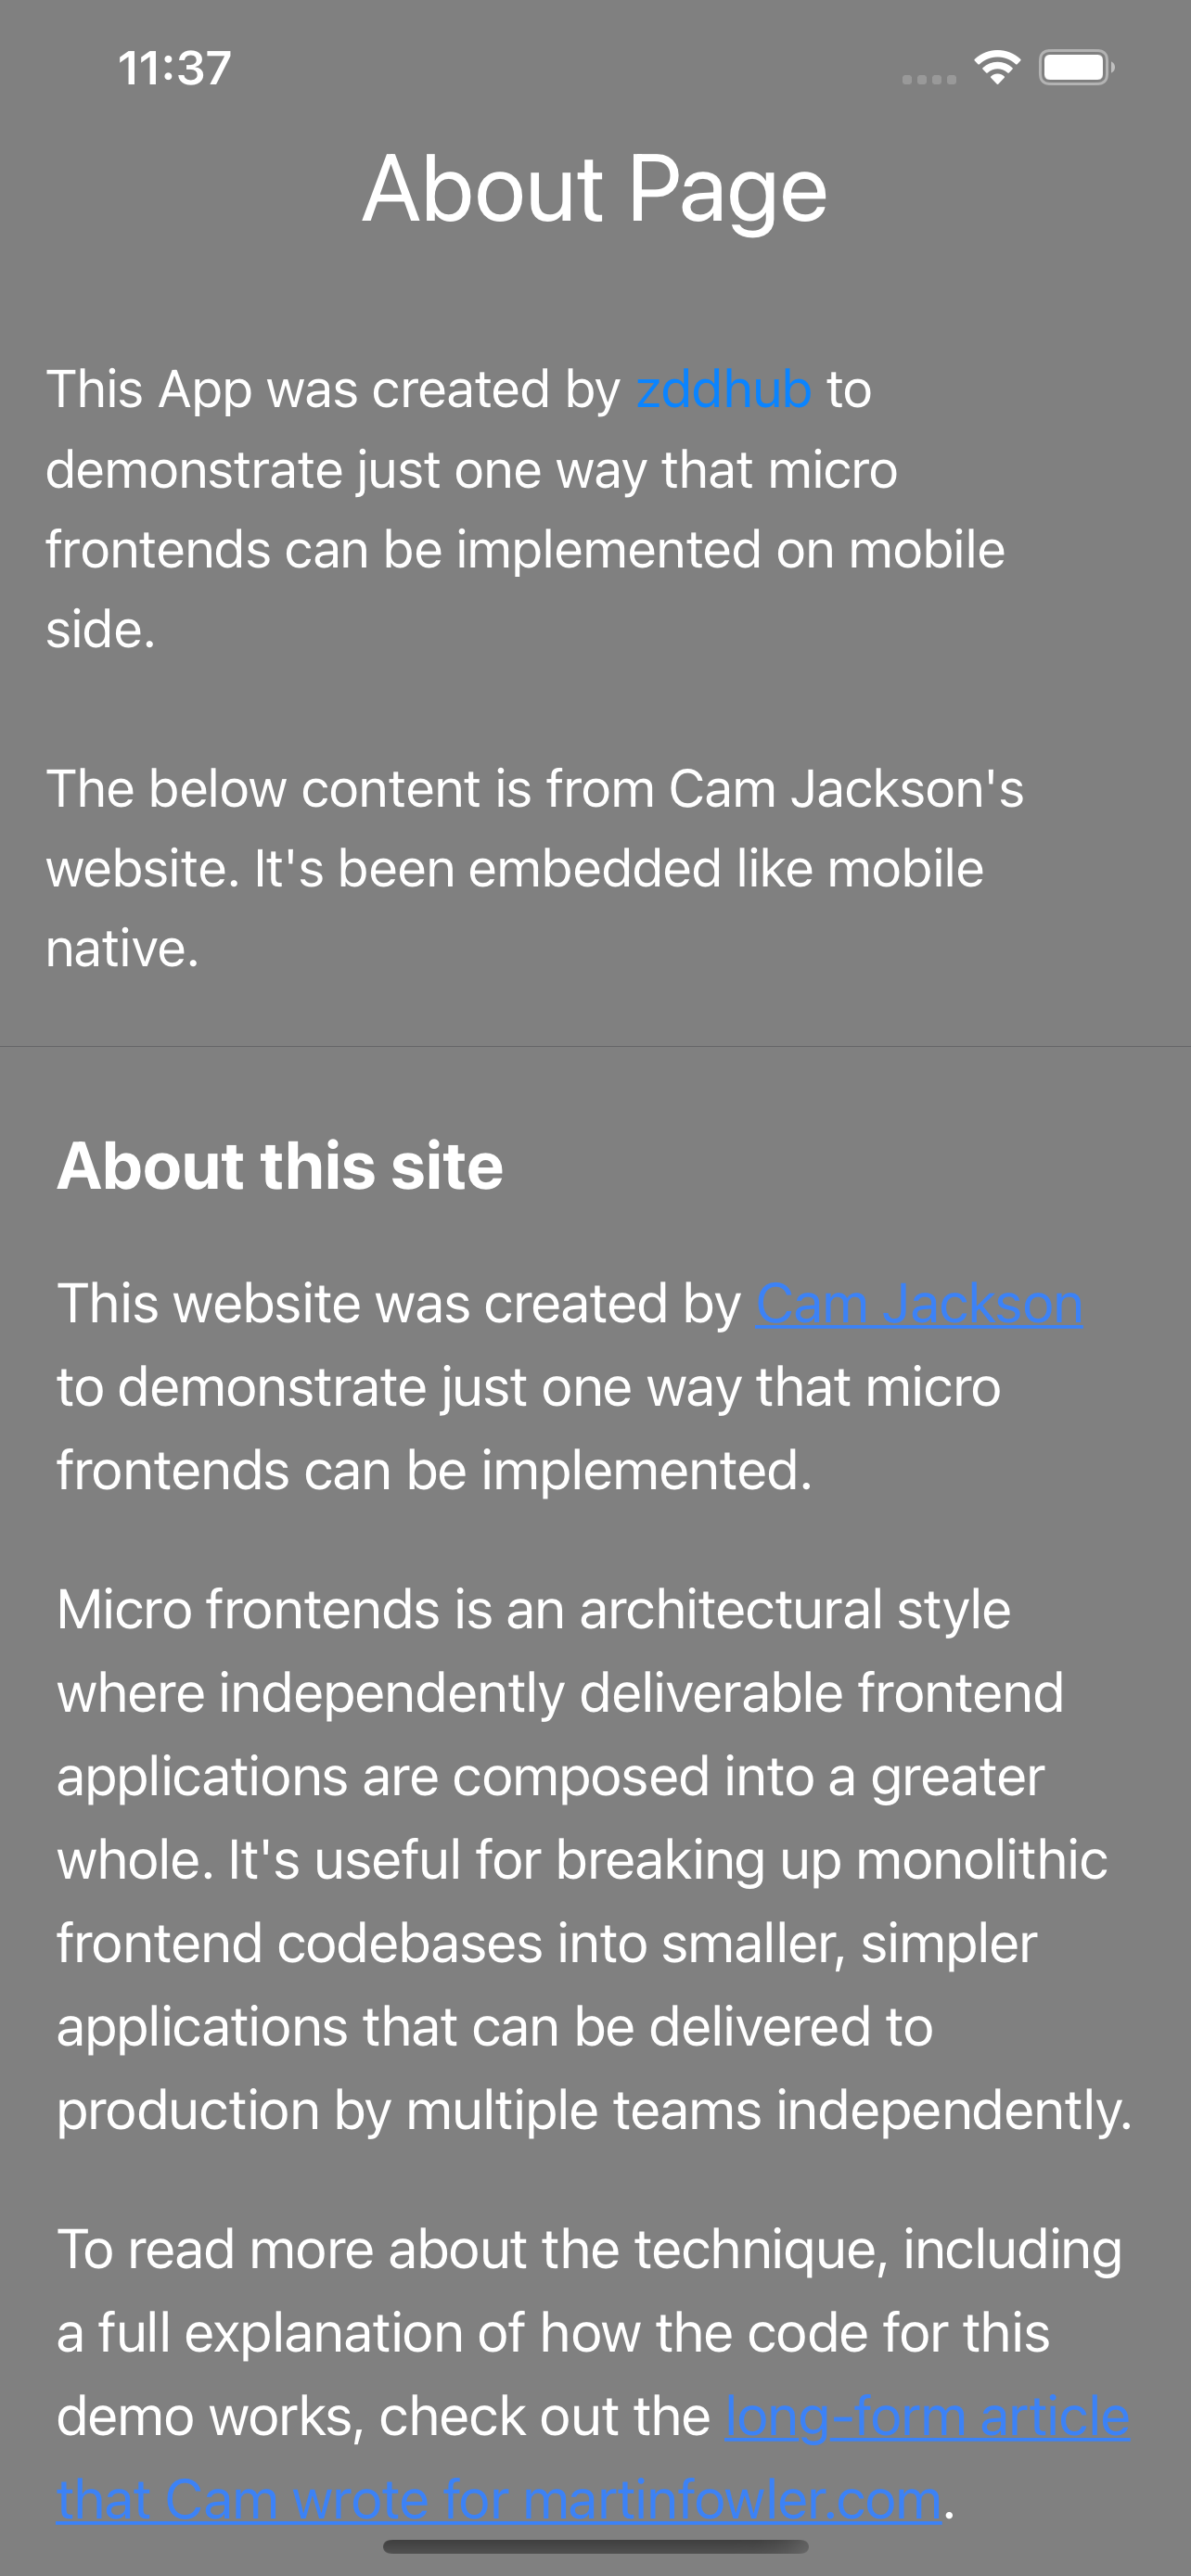 |
Screenshot: Example app of About MFE is on light mode and dark mode.
About MFE should be a screen that shows the user profile, order history, and payment options. In our example, we simplify it as a static content screen. But we get some information from web service via WKWebView to show run-time integration way.
We wrapped WKWebView in AboutWebView and load web content as below:
struct AboutWebView: UIViewRepresentable {
  let url: URL
  var webView: WKWebView = WKWebView()
  @Binding var dynamicHeight: CGFloat

  func makeUIView(context: UIViewRepresentableContext<AboutWebView>) -> WKWebView {
    let request = URLRequest(url: self.url, cachePolicy: .returnCacheDataElseLoad)
    webView.load(request)

    return webView
  }

  ...
}
In order to let users have a native experience, we delegate link click event to open Safari.
  func webView(_ webView: WKWebView, decidePolicyFor navigationAction: WKNavigationAction) async -> WKNavigationActionPolicy {
    if navigationAction.navigationType == .linkActivated, let url = navigationAction.request.url, await UIApplication.shared.canOpenURL(url) {
      DispatchQueue.main.async {
        UIApplication.shared.open(url)
      }
      return .cancel
    } else {
      return .allow
    }
  }
Shell App
ShellApp is a central app that integrates all MFEs to the whole one. It’s the only app that will be deployed to our end users.
Let’s have a look, the content view is pretty simple, right?
struct ContentView: View {

  init() {
    _ = Env.initialize(router: AppRouter() as Router)
  }

  var body: some View {
    TabView {
      browse
        .tabItem {
          Image(systemName: "magnifyingglass")
          Text("Restaurant")
        }
      RandomOrderView()
        .tabItem {
          Image(systemName: "shuffle")
          Text("Surprise me")
        }
      AboutView()
        .tabItem {
          Image(systemName: "person")
          Text("About")
        }
    }
  }
}
Let’s focus on how to navigate to OrderView when the user clicks RestaurantCard, which is a sub child of BrowseView`. Two things need to be done in the shell APP.
-
Wrap BrowserView with NavigationView
var browse: some View { NavigationView { BrowseView() .foregroundColor(.primary) .navigationBarHidden(true) .environmentObject(Env.shared) } } -
Overwrite Router to inject
OrderViewclass AppRouter: Router { override func route(_ to: String) -> AnyView { AnyView( OrderView(url: url(to)) .navigationBarTitleDisplayMode(.inline) ) } private func url(_ to: String) -> URL { URL(string: "\(Env.shared.configuration.host)\(to)")! } }
Wow, We are finished! Explore full source code on Github.
Downsides
Build-time integration approach
It’s a major difference compared with micro frontends for the Web. Limited to the platform, we can do nothing to improve it. We’ve seen enough pain caused by such a lockstep release process in the microservices age, but we still believe it can be manageable on mobile.
On the contrary, Re-compiling and building will reduce the target size.
Duplication
It’s an ideal model to put all functional capabilities in MFE env. In the real world, building full capabilities need years normally, but the user experience team moves fast. It’s inevitable to reinvent wheels among independent teams. For instance, we have 5 different tracking solutions in our organization with 8 MFEs at the beginning.
And also, duplicated network requests are the second big problem. Multiplying the traffic of the requests will heave the service’s burden.
Complexity for small teams
It seems obvious that micro frontends make things complex. There are more codebases, more pipelines, more services, and more content. If you are working in a small team, it’s a waste. Keep in mind to choose micro frontends architecture for a big organization.
Conclusion
Micro frontends for mobile cost a bit more than for web, but we believe that these risks can be managed and that the benefits still outweigh the costs, especially in the big mobile organization.
Acknowledgments
Huge thanks to Cam Jackson for his article and demo.
References
如果你喜欢这篇文章,欢迎赞赏作者以示鼓励